Brewing Equipment

Hi everyone,

Thanks for joining us this week to go through the vast array of any equipment you may need for brewing.

But before I get onto that, here’s what New Beerginnings has been up to in the last week with brewing:

– New Logo! I had an incredibly kind offer from a graphic designer in the UK to do up a logo for me. We discussed what I wanted in a logo for New Beerginnings and I’m so incredibly pleased with the result. Please check him out and give him props at www.stevestarkdesign.com
– Connecting on social media – Because I want to help reach as many people as possible I’ve been working on getting out there on Facebook both on the NB page and several home brewing groups.
– Gauging interest – As part of the social media front I’ve been trying to gauge which possible topics would be of the most interest for the blog to cover. There was a very good response but it was also varied, so in short, the future of New Beerginnings will be varied! We’re going to be covering everything from Ingredients, process and equipment to The chemistry/biology of brewing, some myth debunking and continuing the brew day post series.

Now onto this week’s main topic…

As always, please refer to our Glossary for any terms that are not explained in the post. If you come across a term you think is missing or think needs redefining, please let us know!


Brewing Equipment

Every brewer generally has some sort of specialised equipment that’s unique to brewing. For some it’s just the fermenter and the rest they get by with kitchen equipment, while others have spent significant time and effort creating a high-end, bespoke system designed from the ground up to create beer. While any combination of the right equipment will create wonderful wonderful beer, it’s up to the individual brewer to decide what works best for their own needs.

In an attempt to add some level of organisation to what could be a blog in itself I’ll break this down into a couple of sections:

– Overview & Example – Example of some low to high budget brewing systems to form a basis for the rest of the article.

– Pre-Mash – Any equipment used from the raw ingredients to mash stage. May not be relevant for low budget systems.
– Mash – Any equipment used during the mashing and sparging steps.
– Boil – Any equipment used during the boil process.
– Cooling – A range of equipment used for cooling.
– Fermentation – Any equipment used during fermentation.
– Packaging – Equipment required for packing, from bottling to kegging. Canning not covered due to how uncommon it is in home brewing.

Each of these sections will give a range of possible equipment from low to high budget with their pros and cons listed along with the expected price.

Overview & Example

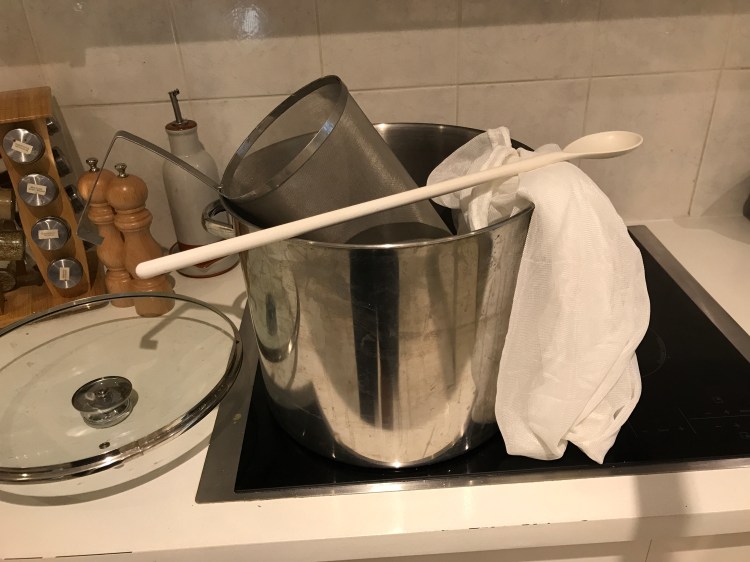
At the very base level you need:
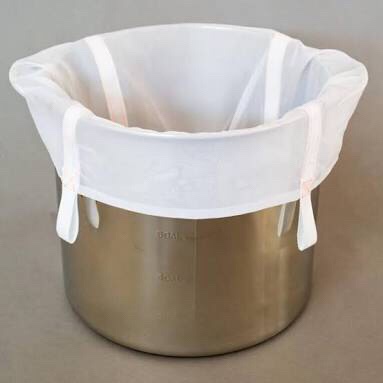
– A Large Pot to Mash/Boil in.
– A Fermenter.
– A Spoon to stir the mash/wort.
– A Bag of some sort to hold grains or hops.

So something like this, plus a sealed bucket in which to ferment your wort and turn it into beer.

With this you can brew and ferment a batch of beer but it misses out several items that allow further control and finessing of certain aspects of the process. To put this in perspective, here is an example of a large high end system:

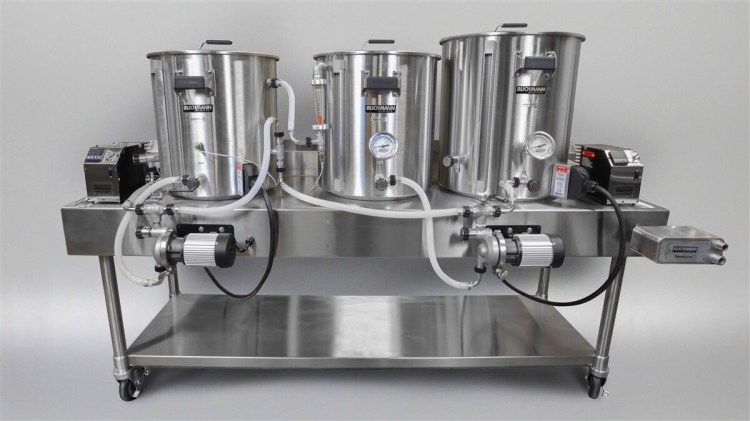
Blichman Engineering 5 Galon Electric HERMS System ©Blichman Engineering

This level of equipment has many more features for precise control of all elements of the brewing process. There are pumps to move water and wort around, burners or electrical elements for heating and they are designed in such a way that a system control panel can automate the process based on certain parameters that you give it.

I have not yet upgraded to a system like this as my brewing space is not set up to handle something like this. Plus, they can get phenomenally expensive! For now I have a fantastic system that you would have seen if you saw my previous Brew Day Post. The Grainfather or systems like it are a great step towards a more accurately controlled, easy to program automated system.

Pre-Mash

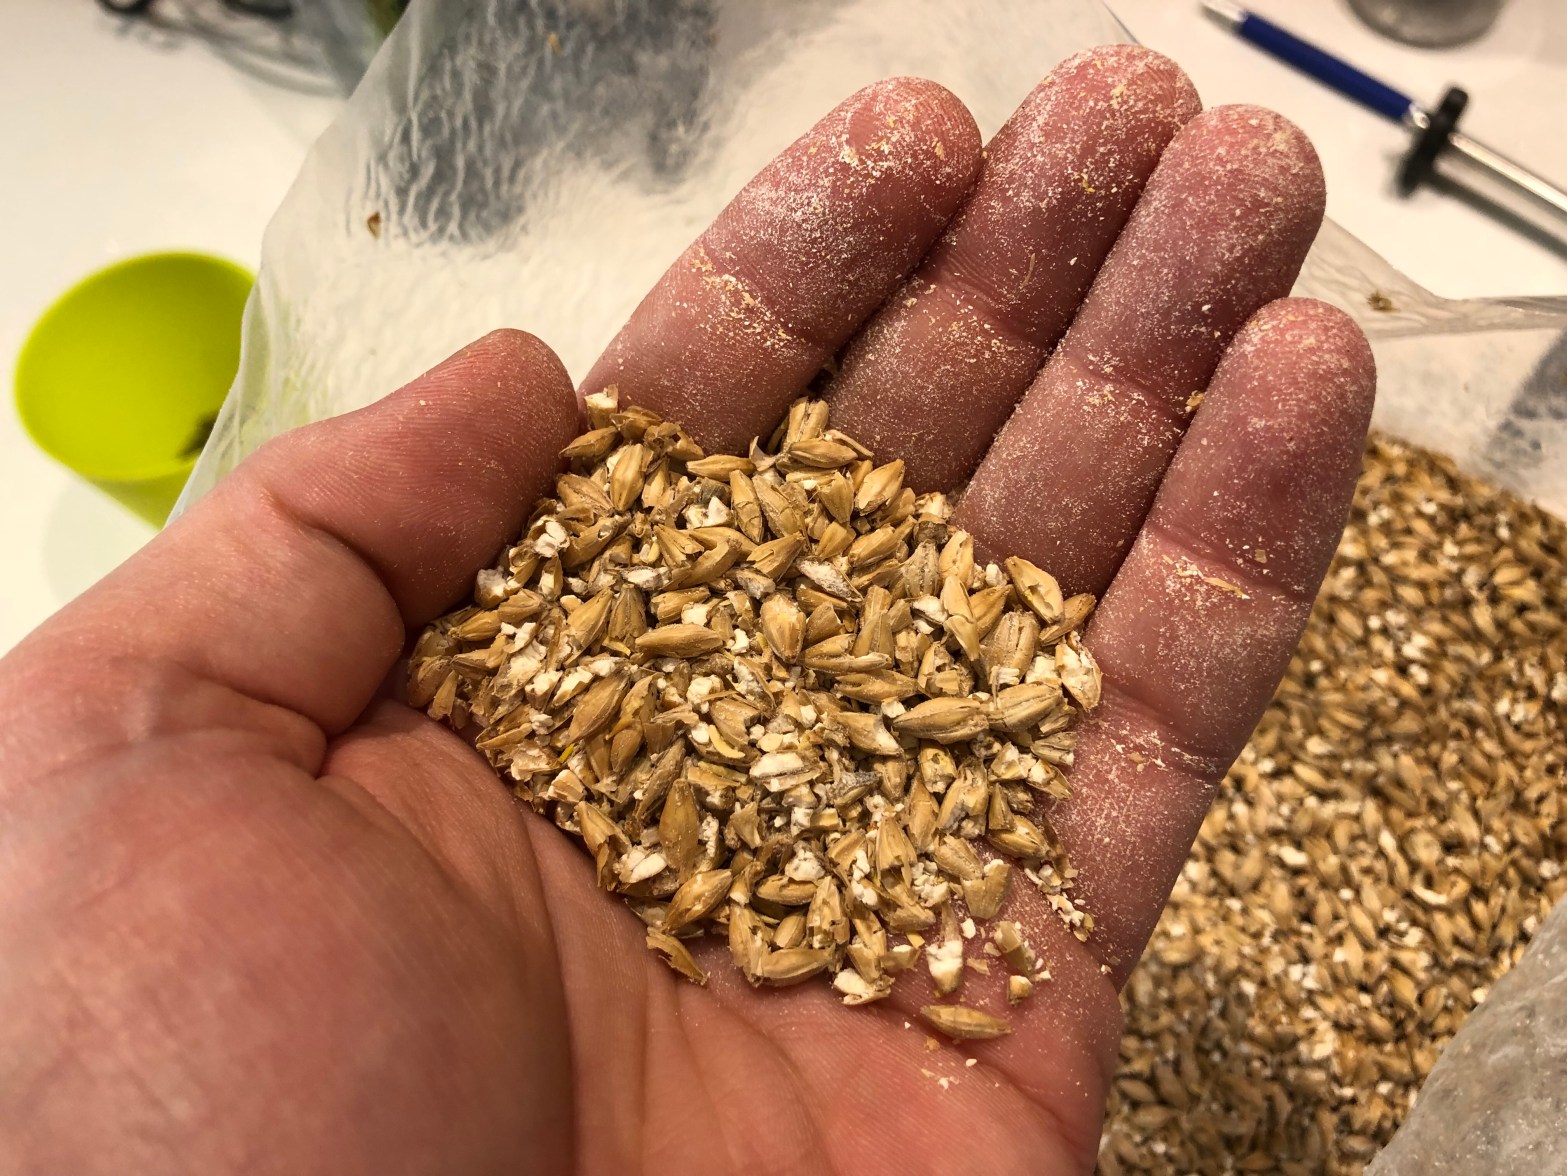
This step involves milling grain and heating water so the equipment required is fairly simple.

Malt Muncher 2 Roller Mill – Approx $150

A mill, like the one above, is a device that crushes grains between 2 or 3 rollers to open up the husks and allow access to the starches contained within. There are cheaper and more expensive models and your local home brew store should be able to guide you in the right direction for your needs based on their stock. What I will mention is that some models with smooth rollers have been noted to have trouble pulling the grain through, I’d advise buying a mill with either a textured surface or one with pre-cut grooves. Some people have also cut small grooves into the rollers themselves to assist in pulling the grain through. NOTE: A mill is not required if you are buying your grains pre-crushed from the store or are an extract-only brewer.

Stock pot to use as a hot liquor tank – Approx $20

A large pot to use as a hot liquor tank. Liquor in this sense is just a liquid and is not to suggest you should mash your grains in vodka! This pot can be basic like the one above (which I found in a department store for $20) or far more advanced like this one which will be more precise in the way it holds temperature as well as having a bigger volume. NOTE: If brewing using BIAB, this is not required as it is a single vessel brewing method.

Example Options with costs:
Small stock pot, no mill: $20
Large pot, 2 roller mill: $249.99
Mash Tun, 3 roller mill: $959.99

Mash

For this step you need a Mash Tun and something to facilitate sparging (unless using BIAB) and depending on your sparging method, you may require a pump.

SS Brewtech InfuSsion Mash Tun

A Mash Tun is basically a pot that will hold hot water and grains and maintain a specific temperature for an extended period of time. Ones like the SS Brewtech Tun above are specifically designed vessels with a double wall insulated with dense foam and have thermometers built in. They are incredible but can also set you back a fair chunk of cash. More economical methods exist with some, dare I say, home brewed setups. These include making insulated wrapping around a regular pot to improve its heat retention properties or my personal favourite, an esky (or cooler, for those of you reading overseas and have no idea what I’m talking about!). Coolers or eskys are already designed with heat retention in mind and are very well insulated to stay at a given temperature for extended periods of time, it’s just that they’re usually used cold.

One consideration you have to make is how to perform the last step of the process, Lautering, which is to separate the wort from the grain. To do this, most Mash tuns make use of a false bottom, a thin metal mesh that sits just above the bottom of the mash tun. This holds the grains above any of the exit holes plus lets the grain act as a natural filter for itself as the wort exits at the bottom and recirculates through the top or the sparging process takes place. The basic setup would look similar to this (please excuse my horrendous hand-drawn illustration!):

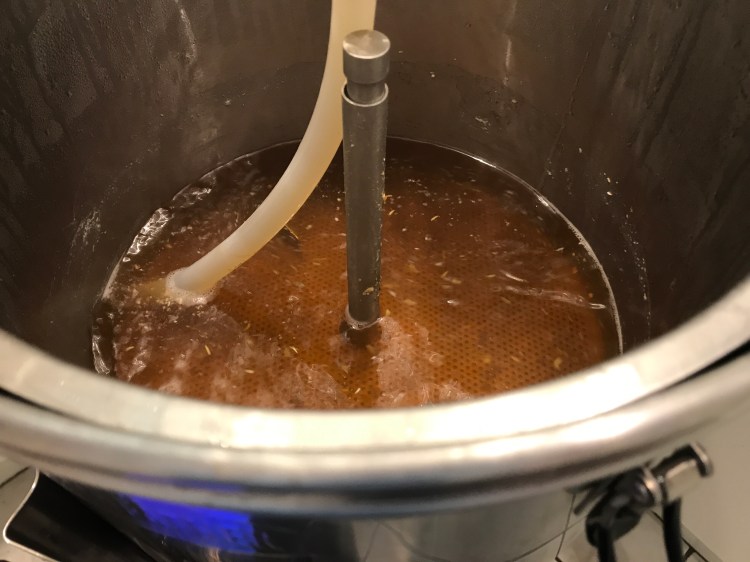
Here is a photo that shows more detail on a fly sparge system, which is basically just a way of spraying the recirculated wort evenly into the top of the Mash Tun.

Example Options with costs:
Esky, Tap & BIAB, Batch Sparge Jug: $142.50
Grainfather – Pump, recirculation, False bottom all built in, Batch Sparge jug: $1,265
Dedicated Mash Tun, Pump + 2m of tubing, Recirculation/sparge arm: $1,047

Boil

Although a simple activity, there are still things to consider to achieve certain results when choosing your boil kettle. More advanced units have additions like inbuilt thermometers, whirlpool arms to help concentrate hop matter in the centre or even internal rotating arms or filters for the tap to assist in getting wort out while leaving trub behind. The main thing to consider is how much beer you would like to make, then get a boil kettle that can hold more than this amount. Several litres of wort will boil off during the 60 minute or higher boil so a 30L kettle at an absolute minimum is recommended for a ~20L batch.

The only other items you may need are a burner if your stove isn’t powerful enough to boil the amount of liquid required (most home stove tops are not powerful enough), a spoon for stirring the wort and a container for the hops, called a hop spider.

Example Options with costs:
Pot, Spoon, Hop Spider: $142
Grainfather, Spoon: $1,254 ($0 if previously purchased for mashing step)
Dedicated Kettle, Spoon, Hop Spider: $502

Cooling

This section has actually been covered already in a previous blog post about the brew day process so I’ll take an excerpt from that post and expand on it:

Cooling

When the boil is finished the wort is actually quite vulnerable microbiologically. It has risk of infection by airborne yeast or bacteria but we can’t pitch our chosen yeast that we wish to ferment with as it will be overcome by the high temperatures and be killed so we need to cool the wort down to pitching temperature but be as quick as we can about it.

To do this quickly brewers can rely on several methods, most involving pieces of equipment. I’ll list these methods below in order of expense and link to an example of one if applicable:

Ice: For some brewing methods, people may choose to add some top up water to adjust their gravity. I used this method for a while but chose to measure out my water then freeze it to act as a chilling method.

Ice Bath: This method is simple, fill a large sink or bathtub with water and ice and place your fermenter full of hot wort in there until cool. Below is a photo of the ice bath method.

Plate Chiller: These chillers are quite effective and basically have two in pipes and two out pipes, one pipe for wort and one for water. Hot wort passes over rippled plates (to give more surface area) that transfer their heat to cool water on the other side. Here is an example.

Immersion Chiller: These are copper or stainless steel coils that will sit in your boil kettle throughout the boil then when you’re ready to cool you connect one end to a cold water tap and place the other end in a sink or safe place to dispose of the very hot water coming out the other end and run the water through the inside of the coil so the wort transfers its heat to the water in the pipe. This method is very effective, often more effective than the plate chillers, especially when you stir the wort as its chilling. Here is an example.

Couterflow Chiller: These chillers are highly effective but often expensive. They consist of one copper coil inside another, cold water flows in the outer coil and the hot wort flows in the inner coil generally but different companies have different designs. Here is an example, below is a picture of the one that comes with the Grainfather.

Example Options and costs:
Ice Bath: $0
Immersion Chiller, 2m of tubing to connect to tap: $167
Counterflow Chiller, 4m of tubing for tap and wort in/out, pump: $232 ($0 for mid tier option of The Grainfather)

Fermentation

This is the step that turns wort into beer, there are chemical and biological reactions happening constantly that have to be kept at precise temperatures, only problem is that the process gives off heat and wants to constantly exceed those temperatures! To say this is a step you should think seriously about is an understatement. Of all the things that should be on your priority list to get under control, I’d say most brewers would agree that Fermentation should be right at the top.

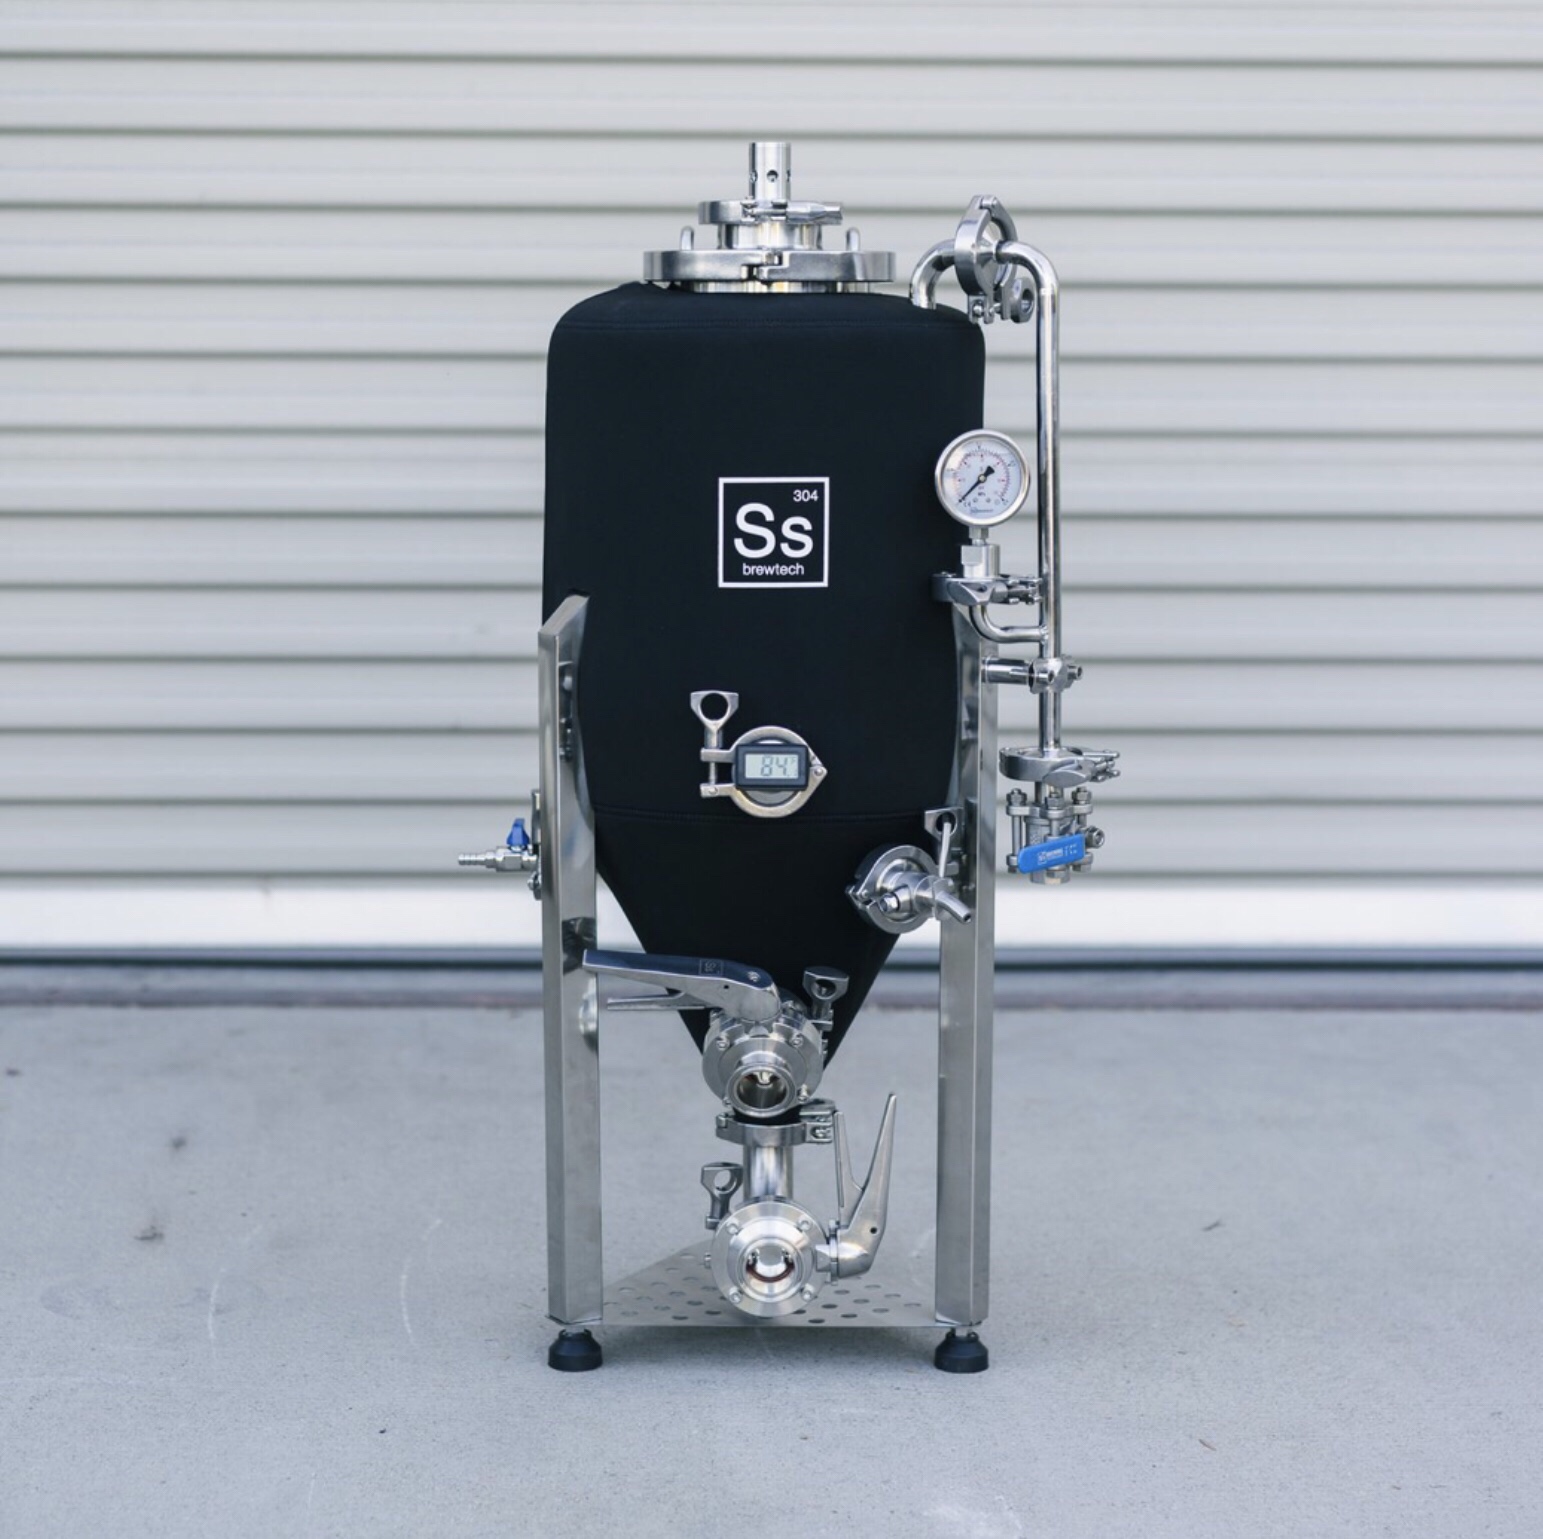
At the very base level, the only equipment you need is a food-safe, sealable plastic tub (like the one above) that can store the amount of beer you require and a place to store it where the temperature won’t vary much from a cool room temperature. The other end of this is an insulated fermenter with an inbuilt coil similar to an immersion chiller with freezing cold glycol running through it. This is similar to the systems that commercial breweries use and is as expensive as it is effective. That is to say, very. See below for an example by SS Brewtech.

Example Options with costs:
Bucket, no temp control: $32
Medium-high tier fermenter, temperature controller, heat pad, 2nd hand freezer (estimated $100): $329
High end Fermenter, Glycol Chiller, Heat pad: $2,344

Packaging

Packaging can mean several different pieces of equipment depending on the path you want to take. There are two kinds of packaging that are the most popular with home brewers today, Bottling and Kegging. They are exactly what they sound like, bottling lets you put your beer in bottles to drink directly out of or pour into a glass, while kegging means putting your beer into a keg, chilling and carbonating it to be placed into a fridge and served on tap.

For bottling you need a capper, bottling wand and caps. A capper is a device that can be standalone or screwed to a bench and looks like this.

A bottling wand is a device that attaches to the fermenter and has a gravity-fed tap on the end that only opens when upwards pressure is placed on it from the bottom of a bottle. This way the bottle fills from the bottom rather than the beer pouring in from the top which risks exposure to oxygen.

Caps should be self explanatory, you place them on top of the bottle and press them down firmly with the capper.

Kegging requires a bit more equipment, namely:
– Kegs….obviously
– CO2 Bottles
– CO2 Regulator
– A Tap
– Gas and Beer lines/tubing
– A fridge/freezer to hold the kegs/mount taps

Kegs come in many different shapes and sizes, the most popular is the 19L Cornelius (Corny) Keg. New they go for about $130-150, 2nd hand they go for about $80-90.

CO2 Bottles and regulators pressurise the kegs to provide carbonation but also to provide serving pressure and push the beer out of the keg. Regulators keep the pressure coming from the CO2 tank regular and consistent to avoid over or under carbonation so your beer comes out of the keg looking like beer and not foam!

The taps and tubing are a given but should be thought about as different taps can give different characteristics to the head and the wrong lines can affect beer quality/head also.

The most important part of this setup is the fridge/freezer to keep the kegs cold, because nobody likes warm beer. These can be bespoke made like this Kegerator from keg king,

Or like this Keezer, home built by Steve at Hoppy Days.

Example Options with costs:
Bench Capper, Bottling Wand, Caps, Bottles (enough for a 23L batch) : $121.50
Corny Keg, CO2 Bottle, Ball Lock Connectors (Gas & Beer), Kegerator: $1,007

Conclusion

This has been a rather large post but could have easily been expanded into a blog of its own. We will continue, in future posts, to dive a little deeper into all of these but I wanted to leave you with a thought, the whole way through I have mentioned a few different paths you can take, a low, medium, and high budget option for each of the categories. These are by no means set in stone and are only designed to be examples of setups you can create but I wanted to add them all together at the end here so you can see what these tiers of systems might end up costing you.

Low-Tier: $458. I feel this is an overestimation really since you can get most of this in a kit for $100, use pots and pans you have at home and save the bottles from the next few cartons of beer that you buy! Maybe $200 if you’re on a real budget.

Mid Tier: $1,969.49 if bottling, $2,854.99 if kegging

High Tier: $6,091.99, I honestly feel like this is a starting point for high end equipment and know it can easily reach into the $10k+ range.


Thanks for joining me this week, look out next week for a post all about our favourite sugar-giving ingredient, Malt!

Check us out on Facebook, Twitter or reach out to us on Reddit!

Brew Day #1 – Pilsner

Hey guys,

Thanks for joining me this week where I’ll be going through my brew day that I had. As it involves what I’ve been doing brew-related this week, I’ll keep the “what’s brewing this week” section shorter than usual. The only other thing that I’ve really been doing is trying to contact people for interviews/photos etc so I can bring some different content to you guys and remaining active in the Home Brewing communities I’m part of, namely Facebook and Reddit.


This week’s brew

This is the first instalment of my Brew Day Series. In these posts I’ll go through not only the process and ingredients used in this brew, but also a little about the why behind them, a little about recipe creation and what I might change in future.

What should I brew?
I have recently invested in some better temperature control so wanted to do a beer that necessitated good and accurate temperature control. I was thinking of brewing a Kolsch but had trouble finding the right yeast so I thought of what had similar ingredients and Pilsner came to mind with a slight change in hops.

Recipe creation
For this Pilsner I decided I wanted to go very traditional and work back from there so I looked at as many Pilsner recipes I could so I got a good impression of what was traditional vs what is popular now and figure out what I wanted in the beer.

I ended up with the following recipe:

91.8% (4.5kg) German Pilsner Malt
4.1% (0.2kg) Each of Melanoiden and Acid Malts

50g of Saaz at 60 minutes
30g at 20 minutes
20g at 2 Minutes

1/2 a Whirlfloc tablet put in at 10 minutes

1 Packet Mangrove Jack’s M76 Bavarian Lager yeast (this was the first time I’ve used this brand of yeast).

This made for a Pilsner that fell within the BJCP guidelines for the style with some traditional elements combined with some more modern ingredients that gave the characteristics I was looking for.

Let’s break this down a little and I’ll go through my choices of ingredients and why I chose them.

Pilsner Malt: I’m making a Pilsner so I’d like to think this is a given. The particular Pilsner malt I got is a German Pilsner malt so it’s very light in colour and gives a nice medium body and head retention.
Melanoiden Malt: This malt is a very highly modified malt in terms of proteins and starches, it is excellent for promoting flavour stability, mouthfeel and body. It is a darker malt which can be scary adding to a characteristically light coloured beer but used in small quantities it’s ok.
Acid Malt: This malt is modified to have a high acid content. The purpose of this is to adjust the pH of the mash to around 5.3, ideal for a light coloured, crisp beer.
Saaz Hops: These are the signature hop in a Pilsner so were an absolute must. They give a herbal, earthy, and spicy aroma and flavour but have a low Alpha Acid content so lots must be added for bittering. You could use a different hop as long as it is European and complimentary to the Saaz but I wanted to do a single hop beer so stuck with the Saaz.
Whirlfloc: Another signature feature of a Pilsner is its crystal clear appearance, for this I wanted to give every opportunity to drop out hot break material so whirlfloc is a must. However, I’ll not be using any other finings throughout the process as I want to do a traditional lagering process, which should assist the beer in dropping nice and clear.
M76 Yeast: I have not used this yeast before but chose it based upon excellent reviews combined with advice from my local home brew supplies store. It is a bottom, cool fermenting lager yeast from Bavaria, perfect for the German Pilsner I wanted to create.

The other thing to note about this recipe is that I performed a 75 minute boil instead of the regular 60. The reason for this is that lighter malts like Pilsner have less DMS precursors removed by the killing process because they are kilned so lightly. Boiling for a longer time removes these and makes your Pilsner less likely to smell and taste like corn on the cob due to DMS!

Equipment and setup
I brewed this batch using a Grainfather system. It’s my second time brewing with one and I liked it even better this time round than the first. It’s very accurate, hit all my numbers and I noticed how it adapts the power of the heating element depending on how close the wort is to the desired temperature to avoid overshooting it.

The first part of the setup for me is to clean out and sterilise any equipment I’m going to use that day to avoid the chances of contamination. I usually clean my fermenter and then leave it until right before I’m needing to fill it to avoid having it sitting out for a long time and getting re-contaminated.

After this I fill the Grainfather up with the water I’m using for the mash and start heating. The Grainfather app has a calculator built in to help calculate how much water is needed for the amount of grain you have and account for temperature.

Once heated I dump in my grains. Normally you would have to crush your grains at this point if you were crushing them yourself but mine were already crushed pretty well by the store. Crushing them breaks open the husks just enough to expose the insides of the grain containing the starch and proteins. It’s only crushed enough to turn it from the top picture below to the bottom.

Mash
This is what the mashing in process looks like, essentially just mixing the grains with the water to ensure there are no dry spots left and all grains are in contact with the wort.

After the grains have been mixed on this system you place another plate over the top to stop the grains from rising and turn on the pump which begins recirculating the mash over itself to help with extraction of sugars and lets the grains act as a natural filter for the wort. The mash continued at 65°C for an hour then 75°C for a mash out for another 10 minutes. Here is the pump switching on and starting this recirculation process on the Grainfather vs what the wort looks like after mashing for 30 minutes:


Sparge
After the 60 minute mash we continue to sparge the grains with some separate sparge water at 75°C. During the sparging step the Grainfather automatically begins heating the wort to boiling temperature so that its up to temp by the time you’ve finished the sparging process.

On the Grainfather system, sparging works by lifting the inner basket and pouring over your pre-heated sparge water to rinse through the grains. There are several calculators out there for mash and sparge water volumes but for this recipe I just used the built in ones in the Grainfather app. See below for a photo and brief video of the sparging process.

Boil

Once you have finished sparging, depending on how long the process takes, you should be ready or nearly ready to boil.

As stated previously, due to the higher than usual risk of DMS that comes with very light malts like Pilsner, this boil was a 75 minute boil instead of the usual 60. The other tactic that’s essential to combating DMS and other off flavours (like Diacetyl or other VDK’s) is a strong, rolling boil. This will help evaporate or convert them into harmless substances that will not turn into off flavours in the finished beer.

The other purpose of the boil is the isomerisation of the Alpha Acids in the hops to bitter the beer. Again, a vigorous boil is essential.

Top: Saaz hop pellets. Bottom: Adding hops to the boiling wort.

During this time, since I had 75 minutes to spare, I decided to make use of my spent grains. Used grains can be used for several purposes as they are high in sugar and nutrients. Some people compost them, others bake (you can use them in bread wet or dried) but I chose to use mine as animal feed as I have a family in my neighbourhood that have several horses. I took some time between hop additions to go down, introduce myself and let them know that I’ll have some feed for them from time to time.

Cooling
Once the boil was over and I had my hop material whirlpooled into the centre of the Grainfather, I connected its counter flow chiller to the pump.

I ran the wort back into the Grainfather for a few minutes with no cold water to sterilise the chiller then ran cold water through also until the temperature dropped about 15-20 degrees. This way when the wort is transferring into the fermenter it is already well and truly ready for the yeast to be pitched. It was around 5-6°C above the temperature of the tap water. You can also see in the picture below that it was remarkably clear when transferring and with long term lagering will only clear up further.

Testing
In order to accurately determine the alcohol by volume (ABV) of the beer you need to take a specific gravity reading just before and at the end of fermentation using a hydrometer. This wort had an Original gravity (OG) of 1.048.

The cloud-like floating material in there is hot break that made it in through the whirlpool and grainfather’s filter and drops out of suspension easily to a brilliant clear finish.

Pitching Yeast
Once all the wort was transferred to the fermenter I pitched the yeast which I rehydrated in room temperature water with some Light DME and pitched the yeast into the fermenter. Once this was done I immediately placed it into the temperature controlled freezer set to a lager temperature where it will ferment for around a month then bottle lager for another month after that.

Next Steps
Other than monitoring the beer and making sure it adheres to lager temperatures the next step is bottling and storing for sufficient time to carbonate the beer. I will update in another post after it has been bottled.


Thanks for reading this week’s post, I will continue to post brew day updates whenever I have one. Other than that, please look out for our next post where start to highlight some of the equipment needed for brewing.

Best,

Sean

Check us out on Facebook or Instagram or follow us on Reddit.

Brewing Process

Hello again,

I’m back again for another quick post but I’d like to introduce a segment at the top of each post where I quickly touch on anything beer related that I’ve worked on in the past week or so.

This week I haven’t been doing much that’s beer related other than worrying about running out of my Golden Ale and collecting enough bottles to brew another batch. One thing I have been working on every chance I got is the Brewing Glossary, This took an immense amount of research and fact-checking and it’s still not fully complete! I’ve enlisted the help of my brother who you will see at some stage will be a contributor to the site. He is providing the background on everything Microbiological and chemistry related due to his current field of study. Please check it out and let me know in comments or by Contacting Us if you would like a definition refining or added.

Anyway, on to this week, in this post I’m going to talk about the brewing process. By this I mean running through things that should be done during every brew day followed by the steps of a basic brew day, stopping along the way to discuss which methods may skip some steps in the process.


Brew day Basics

This section will cover steps that should be common to any brew day.

Cleaning – This should be an activity that every brewer, regardless of other processes, equipment, ingredients or method of brewing should do and do thoroughly. Inadequate cleaning practices leads to everything from off-flavours to legitimately scary bottle bombs. I like to look at my equipment in phases and respond appropriately.

Bottle/Keg full of beer – Drink and enjoy until its gone.

Empty bottle/keg – Rinse immediately, clean and rinse again with proper brewers cleaner such as PBW or something similar. Your Local Home Brew Store (LHBS) should be able to help you out with this depending on what they stock.

Cleaned/Rinsed bottle/keg – Store until ready for next use. If storing a keg for a long time you can fill it with distilled water or sanitiser until ready for use.

Ready to use bottle/keg – Rinse to remove any potential dust that may have formed and sanitise with a no-rinse sanitiser such as Star San. Again, your LHBS can help you choose one that they stock. The no-rinse aspect is important since rinsing with water can reintroduce any potential bacteria/wild yeast that’s residing in the water.

Any equipment used after a brew day – Disassemble completely and clean with PBW or similar. Dry thoroughly and reassemble ready for next use. This goes for everything from pots/fermenters to tubing/pumps, anything that the wort/ beer will touch.

Any equipment to be used during your brew day – Clean again if necessary (e.g. if in storage for a significant enough amount of time to get dusty). Sanitise with Star San or similar and remove any excess foam but DO NOT RINSE.

Brew Day Steps

This section will focus on steps that any brew day must go through. Broken down simply, any brew day should generally go like so:

– Ensure equipment is clean and sanitised.

– Heat water.

– Mash (Unless you’re doing extract).

– Boil, including adding hops.

– Cool.

– Transfer or ‘Rack’ to fermenter.

– Pitch yeast.

– Clean up.

This first step has already been adequately covered in the previous section but in the below section I’ll go through these other points.

Heat Water

I’ll break this step down into Extract or Partial Mash/All Grain.
For Extract this simply means start your water boiling and do any water treatment if necessary (more on that in a later post!)
For Partial Mash/All Grain it means to treat and heat the water you’re going to be mashing with, known as your strike water. It is generally best to use a calculator to determine how much water to add at what temperature as it will change depending on how much grain you have. If using the BIAB method you’ll be mashing with your full volume of liquid so you need to account for evaporation and boil off. Generally 30L should be sufficient for a batch that will end up being ~20L.

If doing a traditional all grain mash then the ratio of water to grain is often of a concern. Too little water and there could be some dry dough ball-like spots in the mash and you don’t get enough extraction but too much and there isn’t enough density of grain to get the best extraction from the enzymes it contains. However, with the popularity of BIAB nowadays where it is standard practice to mash with a full volume of water, this latter concern is thought about less and less often on the home brew scale. The best water-grain ratio generally falls between 2.1-3.1L per kg of grain or 1-1.5qt per lb of grain for those using imperial measurements.

For the temperature you are heating your water to I advise to always use a calculator like the one here or in your brewing software if you’re using it, I use BeerSmith and have always found it to be very accurate. This temperature is very important as your water will cool down once you add your grains to it so you may not get the right enzymatic activity. With a temperature adjustment you can make it so that once the temperature has settled, is exactly at the temperature you would like to sustain throughout your mash.

Mash

Now that our water is heated we can start our mashing process unless we are doing a purely extract brew.

Dump your grains into the correctly heated strike water and stir. Stirring helps to break up any dry clumps so all the grains are in contact with water and able to get the enzymes working and converting the starches into maltose. You can use a spoon but often a large paddle is used that has slots for better mixing.

The mash has a tendency to stay fairly consistent in terms of temperature but care should still be taken to try and keep it as stable as possible either with insulation or temperature control. From this point, mash according to your recipe, including any temperature changes or additions to the mash. Sparge (unless your using the BIAB method and have your full volume in the mash tun) to rinse the grains and extract as much of the sugars as possible but keep in mind over sparging can extract tannins that make your beer bitter and astringent. A good rule of thumb is to check the specific gravity of the runnings and when they hit around 1.010-1.008, stop sparging or stop when you have hit your required boil volume of wort, whichever comes first.

Boil

There are several reasons for boiling your wort.
– Isomerisation of Alpha Acids in hops to bring out the desired bitterness qualities.
– Sterilising your water to get rid of any bacteria that may be still residing in there.
– It’s the only way to remove some of the unwanted proteins and other organic matter that’s in suspension to clear up the beer visually and from any unwanted flavours.
– It’s the only way to break down DMS (corn-like off flavour) precursors so they all get consumed completely during fermentation.
– Removing compounds that cause temporary water hardness (Calcium Hydrogencarbonate)

It is vital for each of these steps to a achieve a strong, vigorous rolling boil. If this boil is not achieved, some of these compounds/organisms will stay in solution and can lead to off flavours or contamination. If you live in a place that is significantly above or below sea level then you may need to double-check your natural boiling temperature and adjust accordingly. If you’re high up then your boiling temperature can be quite low, even over 10 degrees C lower than sea level and you may need to boil for longer. Again there are some calculators available to assist you with this.

The length of time you boil for is something that has been debated by some brewers but the general accepted standard is a 60 minute boil.

Hops added during this time convert their Alpha Acids into iso-Alpha Acids which give bitterness. The longer they are present in the boil, the more Alpha Acid conversion takes place and other hop characteristics are put aside. As a general rule of thumb you can look at it like this:

60 Minutes or more – Alpha Acid conversion to add lots of bitterness, little to no flavour, little to no aroma.
45 Minutes – High bitterness, medium flavour, little to no aroma.
30 Minutes – Medium bitterness, high flavour, low aroma.
15 Minutes – Little bitterness, medium flavour, high aroma.
0 Minutes (Flame Out) – Little to no bitterness, very low flavour, very high aroma.

At the end of the boil a cake of organic material from proteins in the wort to hop matter usually collects at the bottom of the kettle. To help clear this out of the rest of the beer, a whirlpool is often formed to help collect it all in the middle at the bottom of the kettle where you can then siphon off the beer and have it be clearer than it otherwise would be. It can be started by hand, grab a spoon and start stirring or if you’re using a pump then you can recirculate it in a circle to start and maintain the whirlpool.

Cooling

When the boil is finished the wort is actually quite vulnerable microbiologically. It has risk of infection by airborne yeast or bacteria but we can’t pitch our chosen yeast that we wish to ferment with as it will be overcome by the high temperatures and be killed so we need to cool the wort down to pitching temperature but be as quick as we can about it.

To do this quickly brewers can rely on several methods, most involving pieces of equipment. I’ll list these methods below in order of expense and link to an example of one if applicable:

Ice: For some brewing methods, people may choose to add some top up water to adjust their gravity. I used this method for a while but chose to measure out my water then freeze it to act as a chilling method.
Ice Bath: This method is simple, fill a large sink or bathtub with water and ice and place your fermenter full of hot wort in there until cool.
Plate Chiller: These chillers are quite effective and basically have two in pipes and two out pipes, one pipe for wort and one for water. Hot wort passes over rippled plates (to give more surface area) that transfer their heat to cool water on the other side. Here is an example.
Immersion Chiller: These are copper or stainless steel coils that will sit in your boil kettle throughout the boil then when you’re ready to cool you connect one end to a cold water tap and place the other end in a sink or safe place to dispose of the very hot water coming out the other end and run the water through the inside of the coil so the wort transfers its heat to the water in the pipe. This method is very effective, often more effective than the plate chillers, especially when you stir the wort as its chilling. Here is an example.
Couterflow Chiller: These chillers are highly effective but often expensive. They consist of one copper coil inside another, cold water flows in the outer coil and the hot wort flows in the inner coil generally but different companies have different designs. Here is an example, below is a picture of the one that comes with theGrainfather.

Transfer/Rack To Fermenter

This step is simple but has a few considerations. Firstly, are you siphoning or pumping? Siphoning is cheaper as you don’t have to buy a pump but it’s slower and unsanitary unless you buy a siphon starter like this one to avoid using your mouth. Pumping (as shown in the above photo with the Grainfather) is faster and easier but you need to buy and maintain a pump like this one.

Pitching Yeast

Once your wort is cooled you can take a Specific Gravity (SG) reading and pitch your yeast. At the recipe creation stage you should give yourself an idea of how much yeast you need to ferment your beer. Most packs come with enough yeast to ferment at least 23L of full strength wort (about up to 1.050-1.060 SG) if either of these aspects are increased (more beer or higher SG) then you should consider pitching two packs to avoid a stuck/stalled fermentation where the process stops and you’re left with a considerably higher SG than you intended and your beer will be very sweet.

If using dry yeast, it’s best to rehydrate it to get it acclimated to a liquid environment. I do this by placing it in a glass of lukewarm water with some Dry Malt Extract (DME) for food for 30-40 minutes before I need it.

If using liquid yeast, it’s usually recommended to make a yeast starter in water mixed with DME around 24 hours before you need it. There are calculators out there to assist you with pitching rate and starter calculations or it may be available in your recipe creation software like BeerSmith.

Cleanup

So during and after all of these steps and your beer is in the fermenter, it’s highly recommended that you immediately clean all of your equipment thoroughly using the thought process listed above. There are a great many articles on cleaning so I’ll not go through it here but rather point you to my favourite one from Brülosophy creator Marshall Schott, here it is.

I hope you enjoyed this week’s post and found it informative. As always, please let me know in the comments or by contacting us if you’d like any more information or believe you may be able to correct or further define anything within this post.

Until next time,

Sean

Like us on Facebook and Instagram or get in touch on Reddit.

Brewing Methods

Introduction

There are many different options available to brew beer. All have their advantages and disadvantages but all in the end make delicious beer. In this post I’ll be talking to you about these different types of brews and why you could wish to go for one over the other. Apologies about the long gap between my previous post and this one, having a relatively new baby at home along with some changes at work can sometimes make you put things by the wayside.

I’ll preface the rest of this post by saying there is no ‘right’ way to make beer except the way that helps you enjoy the hobby and end product. I’ll touch on my own personal experience with all of these methods and options but please bear in mind that this is only my experience and opinion that I’ve drawn based upon it. I’ll make no recommendations other than stating something objective about that option in relation to achieving a specific goal. For example, Hopped extract is cheap and fast whereas all grain can get expensive and takes longer so if you’re short on cash and want a quick brew, hopped extract may be your best choice and you may want to steer clear of all grain until you have more time and budget to brew.

History of home brew styles

Nowadays there are a great variety of products available to home brewers but it wasn’t always the case.

When the hobby of home brewing first took off I’d venture an educated guess that it was all grain or nothing. You would have had a large pot on your stove to boil in and a bucket/pail to ferment and that’s it. Finding grain and hops were difficult, let alone finding them fresh! To say there would have been a lack of consistency in your beer would have been an understatement.

Then came the advent of easily accessible home brew stores. All of a sudden you had access to proper equipment, fresher ingredients and a little advice to go along with it.

Something that was happening in the professional brewing world at this same time was the introduction of malt extract. Basically a brewer would make wort and evaporate off some or almost all of the water. The reasons for this were varied but one notable benefit for breweries such as Guinness (that were struggling with shelf life but wanted to expand to wider areas of the world) was that they could brew an extract of the darker and more essential to flavour/mouthfeel components of the brew and export that, allowing breweries (for a subcontracting fee) to brew licensed Guinness at locations closer to their market. Guinness drinkers didn’t notice a difference but the overseas drinkers had a marked improvement in freshness and quality.

Not long after this, these products became available to home brewers and brews got quicker, easier and more predictable.

Nowadays also, it’s not only the ingredients available to home brewers that are better, but some of the equipment available rivals that of commercial breweries. Some equipment has moved far beyond a pot to boil in and a pail to ferment in. Although there is nothing wrong with using these.

Methods of modern brewing

They options we now have as brewers are vast, this section aims to explain the most common methods of brewing used by home brewers today. While some of these methods are very tried and tested, they do not denote the ONLY ways in which you can brew. Different combinations and experiments are encouraged, this way you can find the method that truly works best for you.

Find the methods below in the order generally accepted as the least to the most involved.

Hopped Malt Extract

Equipment Needed:

– Pot – To boil water and dissolve the sugar/extract.

– Fermenting vessel – A closed container with an airlock (plastic object in top left corner of picture) and tap to bottle from.

– Bottling wand – Stick with a gravity-fed tap that releases when it hits the bottom of a bottle. This allows bottles to fill from the bottom up rather than pouring in from the top to keep as little contact with oxygen as possible as this can spoil the beer.

– Bottles – Many places sell plastic bottles with screw caps but I find these to not hold pressure as well as glass. You can save the bottles from any beers you buy and reuse these. Use brown bottles as much as possible as light also spoils beer.

Approximate cost per batch: $10-20

Bottles per batch: ~60-65

For many getting into the hobby, this is an easy and common way to start up. It comes as a can, usually with yeast attached on top of the lid and all you have to do is add 1kg of sugar and 23L of water and you have your beer.

Hopped Malt Extract is essentially wort that has had most of the water evaporated off it. Leaving just the sugars and hop oils/acids. The brewer mashes the grains, boils the wort and adds hops for you. Essentially allowing you to just rehydrate, add extra sugar to achieve your desired finishing ABV (Alcohol By Volume, in percent) and ferment.

This is the easiest, quickest and cheapest beer you’ll probably ever make. The whole process takes an hour (less if you actually try to) and ends up costing about $20 MAX for around 60 bottles, it’s pretty impressive.

Why doesn’t everyone brew like this? I think it could be boiled down (a-thankyou!) to 3 reasons:

– Control: With this type of brew you have very little control over the flavour of the finished beer. Mashing temps, boil schedules, grain/hop bill choices are all made for you so it’s easy but lacks the control over the recipes that many home brewers like.

– Options: Because of this lack of control, you also are left with only the options of what the brewer chose to create. Want an India Pale Ale (IPA) made with Fuggles and Tettnanger hops? Bad luck (also, eww). Love a black lager but have no kits that will make it? Too bad. From this point you have to expand to something that allows you more options but will also tie in to…

– Process: If you, like me, love and are fascinated by the process of brewing then hopped extract probably isn’t going to cut it for you. Sure it has its own process but it is essentially an advanced course on cleanliness and rehydrating things. At what point does it become ‘brewing’? I asked myself this question and found hopped extract to not point to the answer for me. It was my roots and where I started but I soon moved on to.

Malt Extract

Equipment required:

– All equipment listed in previous section.

– A Hop Spider/Bag: to hold hops in during the boil so they don’t make it into your finished beer.

Approximate cost per batch: $20-25

Bottles per batch: ~55-60

The next step up is un-hopped malt extract or just ‘extract’. This can be the very same product as above except it misses out the hops in the boil which allows you to add them yourself, controlling part of the process and giving you a few more options. You can finally have that Fuggles/Tettnanger IPA!

Another common step taken amongst extract brewers is adding steeping grains. The extract process, by which I mean when the extract itself is evaporated down from wort, also evaporates some proteins from the wort that help some flavour and mouthfeel characteristics. Steeping grains allows some of these to be re-introduced, improving the body of the beer and adding some flavour/colour characteristics as well. Now that Black Lager can be yours too!

This is the next logical step after hopped extract as it adds back in just one part of the brewing process. This is a step I made after a time using hopped extract but you don’t have to make the same leap, you could jump straight on into something like Partial Mashing.

Partial Mash

Equipment Required:

– All equipment listed in previous section.

– A pot/cooler to Mash in, consider this carefully as it must be able to hold a stable temperature to within +/- 1 degree C.

Approximate cost per batch: $20-30

Bottles per batch: ~55-60

Partial Mashing is the first step towards all grain brewing but can often be done on the same scale as extract brewing, meaning minimal to no extra equipment needed.

The main portion of the grist (combination of ingredients that will produce sugars in the final wort) is still malt extract but added are grains, mostly specialty grains (to add colour/flavour) with some base malt added in so some more sugars are added in. This grain mixture is mashed. Mashing is when the grains are mixed with water and held at a specific temperature for an amount of time to allow the enzymes in the grain to convert the starches into sugars.

After the mash more water may be added if it wasn’t added during sparging. Sparging is the process of rinsing the mashed grains to extract the last of the sugars and increase the volume of wort to go on to boiling. After this the wort is boiled and hops are added, exactly the same steps as with extract brewing.

To me this step is necessary if you want to experiment with the all grain process without getting into the expense of buying additional equipment. Other than that it seems like you’re not quite doing extract or all grain but having a foot in both camps and doing a fair bit more work for not much more in terms of control, options or a difference to the finished beer. I did one batch to test my process and see if my current equipment could handle mashing effectively. It could so I immediately moved on to all grain brewing.

All Grain

Equipment required:

– A Mash Tun: This can be a pot, large cooler or specialised unit made from the ground up to mash in. Basically what you need here is something you can use to hold a large amount of grain and water in a very narrow temperature range (+/- 1 degree C) for an hour or so. A cooler works well as it’s designed to hold the contents at temperature anyway and it works as well for keeping things hot as it does cold.

– A ‘Hot Liquor Tank’: can be a hot water urn, another pot/tun or anything that can hold a large amount of hot water (15L or so usually)

– A Boil Kettle: Make sure this is compatible with your heat source (can stand the heat of a strong flame or works on induction etc depending on your heating method). It should ideally hold at least 30L comfortably to allow for the wort to boil down to 20L or so over an hour.

– A Pump & Tubing: To move beer between vessels during the mashing and boiling processes.

Approximate cost per batch: $25-60

Bottles per batch: ~50-55

All grain brewing is what it sounds like, it starts with raw ingredients of Barley, Hops, Yeast and Water. You must select the grains you need (either from a recipe you made up or a kit recommended by the home brew store), crush the grains (most stores will do this for you) mash the crushed grains to extract the sugars, boil the wort, add hops, ferment and package.

This is by far the most involved way to brew. You don’t necessarily have to know much more to brew this way than with extract but you do have to pay close attention to things like time/temperature. It also generally means you need to buy some more equipment as listed at the top of this section.

Brew In A Bag (BIAB)

This is a method of all grain brewing that lets you do away with the 3 vessels required for traditional all grain brewing to use either just a pot and mash tun or even just a pot. The only extra piece of equipment you need is a reinforced mesh bag to hold grain. Click image below to head to brewinabag.com and see their range of products to fit your equipment.

This method allows you to brew with your full boil volume and extract as much from the grains as possible. I started using this method and still use a form of it today, only in a Grainfather, which is a piece of equipment designed to automate the process to a certain extent. You put water in, it heats it to within a degree of your specified mash temp and you put the grains in a basket, a pump then recirculates water over the grains while a heating element at the bottom keeps it at the right temperature. When the mash is finished, you remove the grains and start the boiling process, the app then reminds you of your hop addition schedule according to a recipe. For me, being the process, numbers, and accuracy-driven person that I am it is perfect but it’s a big expense and not for everyone.

I hope you’ve enjoyed this article and gained some information from it that will allow you to choose a method that works for you. In upcoming posts I’ll go through the process for each of these in a bit more detail to help you get going with your first brew!

Bye for now,

Sean

Like us on Facebook and Instagram or get in touch on Reddit.

What is brewing?

abundance agricultural agriculture arm
Barley grains before malting

In this post we’re going to into a bit of a background in brewing, what it is, its history as a profession and hobby. We’ll also discuss an aspect of brewing that is one of my favourites, the culture that surrounds it.

You’ve no doubt heard or guessed that brewing is a long-practiced art form. Ever since there was cultivated crops, there was beer. The earliest known beer of any form was residue found in pottery from the region of present day Iran, it was 7000 years old. It’s mind-blowing to think that people figured out that sweet grainy liquid left out would produce a tasty beverage when the thought of it is actually quite revolting. It’s essentially a bread recipe gone as wrong as it could possibly go, then left out in the open air in a clay pot for several months. I commend the man that was the first one brave enough to try that liquid, let alone stick with it and make it into beer!

Obviously the process has developed immensely since those clay pots left out in the Iranian sun. Today brewing beer is a multi-million dollar business and has firm roots in the forefronts of agriculture, science and industry. This said, what I love is that at the end of it you can still sit down with a drink you made and think “damn, beer is good! And I made this!

” in the same way people did thousands of years ago.

But back onto our topics, what is brewing?

Brewing is, in it’s simplest form, a process that turns grains (predominantly Barley) into an alcoholic beverage through fermentation with yeast. The basic process is:

  • Germination or Malting – The harvested grain is grown and developed in a malt house under careful conditions to allow the endosperm to germinate. The germination process produces starches and enzymes that will be later used to extract sugar. The process is stopped by kilning the grain before the plant can begin to consume the starches and sugars produced, allowing the use of these sugars by the brewer.
  • Mashing – The malted grain is added to warm water to activate the enzymes within. The enzymes convert the starch into sugars which seep into the surrounding water, which is then siphoned off to a large pot. At this point the liquid is referred to as ‘Wort’.
  • Sparging – The mashed grains are then rinsed with more of the warm water to extract further sugars from the grains.
  • Boiling – The wort is boiled to remove impurities that can cause off-flavours and to allow adequate time for the addition of hops to add bittering, flavour, and aroma characteristics to the wort. This process typically takes 60 minutes, after which the wort is cooled and yeast is added. Once yeast is added, the liquid is technically (and legally) beer.
  • Fermentation – The beer is left in a container with the yeast for an adequate amount of time for the yeast to consume the sugars and produce alcohol. Sometimes there are more hop additions during this stage, referred to as “dry hopping”.
  • Packaging – This is arguably every brewer’s least favourite step in the process, especially if they are bottling! Packaging is simply the process of transferring the beer to a vessel from which it can be served, be it bottles or kegs.

The stages of this process have remained the same but our ways of doing them is what’s changed. Brought around by advances in agriculture and micro-biology, we have now been able to modify malts to produce more of the kinds of sugar we need and harvest and cultivate different strains of yeast that are more suited to brewing. We no longer need as much grain to brew and can ferment in closed, controlled conditions as opposed to large open fermenters relying on wild yeast in the air to ferment the wort.

As stated before, brewing is now big business and drives constantly forward to develop new technologies and techniques. Many of the techniques and processes are used in both professional and home brewing although they were almost all born out of the professional brewing industry and not always 100% proven as making a big difference on the home scale.

Commercial breweries have many other concerns to look out for. Their ingredients per batch are incredibly expensive compared to a home brewery. The worst that happens if I screw up a batch is I waste $50-100 on ingredients and have to dump and remake it. If the same mistake happens in a commercial brewery it costs thousands of dollars in ingredients, wasted time, wages, cleaning products and even potential charges from the council for having to dump a large amount of live organic waste into the sewage system which can wreak havoc with sewage treatment plant ecosystems.

In short, it’s in a brewery’s interest to take as many chances as possible to reduce the risk of a bad/inconsistent batch so methods of control are born to govern and standardise almost every aspect of the process. Many however, do not make sense or make a noticeable difference on the home brew scale. More on that in a later post. Check out our links page for links to a website/podcast/blog that puts many of these theories to the test!

One of the most important aspects to me, one that would keep me in the hobby during doubtful periods, is the culture surrounding beer and brewing. I love that there is a never-ending supply of people that enjoy the process as much as myself, love discussing the end result and giving feedback or giving advice if something has not gone right. There are many ways to immerse yourself in this culture:

  • Forums or other online communities
  • Social Media Groups
  • Home Brew Clubs
  • Learning to appraise beer with practical methods (going to bars serving good beer with friends and exploring their range on offer)

For some examples of these visit the links page.

Thanks for joining us this week for our discussion on what brewing is, its history as well as a discussion on commercial vs home brewing and beer culture. Join us next time for a look at the ways you can get into this hobby and the types of brewing methods commonly available to home brewers.

Until next time,

Best,

Sean

Like us on Facebook and Instagram or get in touch on Reddit.