Introduction
Hi all, this post is essentially the culmination of all previous posts on process and ingredients. It ties all of these things in together to form a recipe.
I’ll leave all the details for the main section of the post but I’ll at least tell you that I’ll be covering:
- Deciding when to try your own recipe
- Brewing to a style
- Ingredients Selection
- Process considerations
- Documenting your recipes for adaptation later
For now I’ll get on with letting you know what else I’ve been up to…
Last Week(s) in New Beerginnings
Well this is a little awkward isn’t it? I’ve been gone for a bloody long time! I have had to take some time off for reasons I’ll explain in a different post (more on that later) but I’m back now and plan on updating and posting whenever time permits. One thing I would say is if anyone has a topic they’d like to share by all means please hit me up and we can write a post on it to keep more and more contribution happening and put out more regular content.
But for now, let’s get down to business.
Recipe Creation
Something that I find so appealing about this hobby is that it’s yours to make it what you want it to be. By this I mean that if you’re happy with a hopped extract kit like Coopers and fermenting in a plastic bucket with water from your garden hose, great! If you want to build a 3-Tier HERMS system, mill your own grain and use RO filtered water to build a water profile from the ground up, then that’s just as good.
No matter what you do, as long as you’re happy with the beer you produce, that’s all that matters!
At some point in the journey however, many if not most brewers toy with the idea of brewing something they can truly call their own. This often means making their own recipe.
It may sound simple but creating your own recipe from scratch can be incredibly daunting. How do you decide what to add, how much do you add, is the recipe in line with style and do I even care about that?
There has to be a starting point to this process or else it’s easy to get bogged down in questions. My advice is to just pick a point and go with it…
Starting Point
My own starting point that I typically use is what beer I feel like at that particular moment or something I’ve wanted to try. It’s important to decide on something that you already like and in the early days, even go for a clone of a commercial beer so you have a frame of reference for what the ingredients do.
For your first recipe you could decide to go simple and work on a SMaSH beer (Single Malt and Single Hop) for the sake of ease. This takes out of the equation the trouble of blending different ingredients and you can generally still get a tasty tasty beer. It also doubles as a great testing ground for ingredients allowing you to see what a certain grain or hop does without having other things getting in the way of its flavour, perfect for new brewers figuring out what they do and don’t like.
As your confidence grows you can start to add other ingredients to get more depth of flavour. SMaSH beers can tend to be very simple and one-dimensional and you’ll eventually want to get other things in there so you can increase flavour, colour, head retention etc.
Above all else, at some point you have to just commit and start brewing. Using software can help massively as you can compare your changes to a style guideline to reassure you in your decisions.
Style or No Style?
Speaking of style, this can be an important thing to consider when starting to design your own recipes. Some use it as a basis for the recipe and design the entire beer according to a style. Others design a recipe and fit it to a style afterwards.
For your first recipe, or even your first few, I would generally brew to a style.
For those of you thinking “I want to make my own beer! I don’t want to be constrained to a style!” I totally get it, it’s important to feel good about the beer you’re making and take ownership for it.
This said, the reason I recommend it is that it gives a very solid foundation for you to start building recipes from. Some styles even have ingredient recommendations for you.
Ingredients Selection
Obviously the first step in actual recipe design after deciding what you want to brew is beginning to add ingredients. Here is where you start to decide on the flavours, combinations and quantities that you would like to get your beer just right.
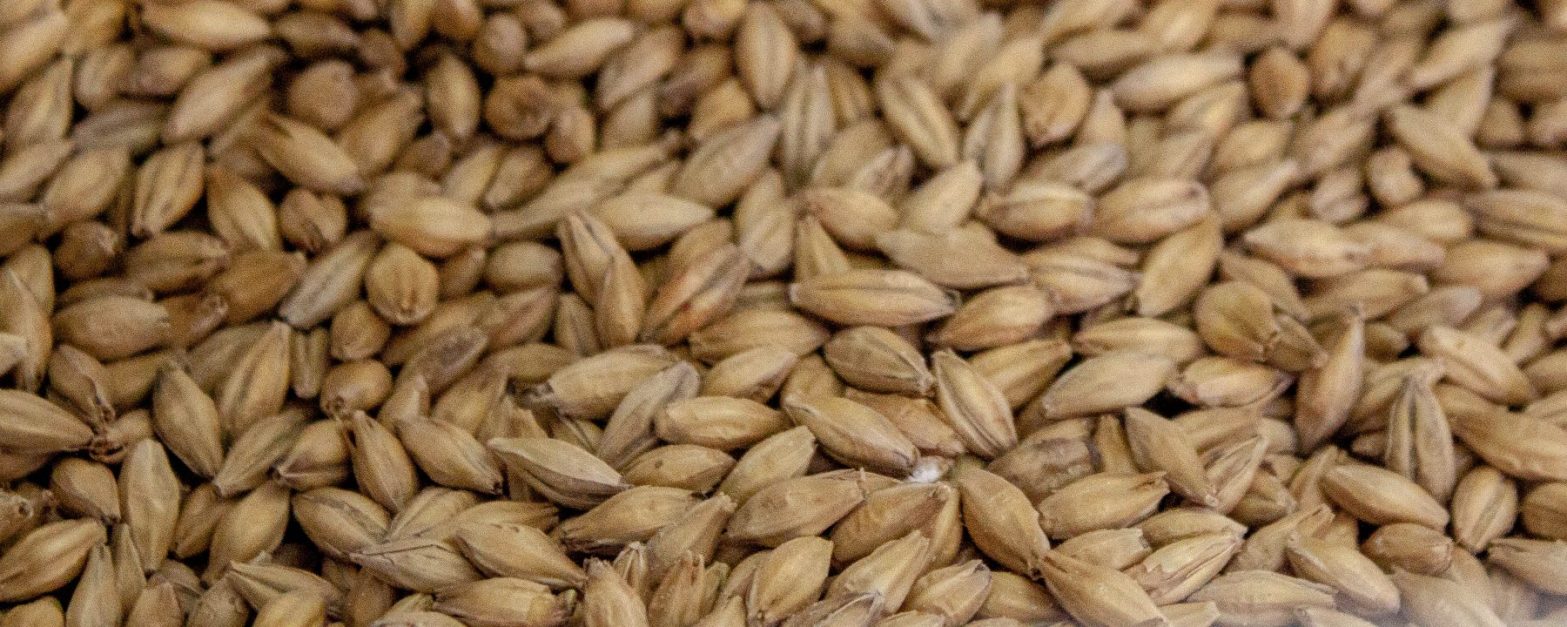
Malt
Malt in most recipes can be split into two sections, base malts and specialty malts.
The base malts are exactly that, your base. They form the majority of fermentable sugars in the beer as well as contributing other important components to aid head retention, mouthfeel etc. They also provide some colour although the amount may be somewhat limited if there are high amounts of specialty grain being added for colour adjustment.
Specialty grains are added to give beer an extra depth of flavour and colour. Although there are some that are added with specific goals in mind, like Carapils for body and head retention or acidulated malt to adjust mash pH, most specialty malts adjust colour and body/sweetness.
How much of what specialty malt you add is totally up to you but I would advise to keep it simple at first, very few recipes ever call for 10 different malts and in many cases you can get away with doing the same thing with only 3-4. Choosing the right malts in the right ratios is far more important in terms of complexity than chucking many different malts in together.
On the topic of what malt to add for a particular beer, I would remember that although many of the sugars will get fermented out, they are not the only thing that forms the taste component of malt (for a more in-depth look at this, check out the Malt post in our ingredients series).
The other things that add flavour are generally quite characteristic of a particular malt. So adding US 2-row barley in an English bitter will not be the same as using proper English grown, floor malted Maris Otter.
Whenever possible, always try to stick to a malt that is correct for the style/origin of the beer you are wanting to produce.
But as with anything, there can always be exceptions to the rule so I would suggest brewing the same beer using local ingredients vs that same ingredient from a maltster from that region.
For example a Vienna lager using either Gladfield (New Zealand) or Weyermann (German) malts. For me, if I can get the beer I want and I feel it’s true to style, I won’t care if I’m using a ‘traditional’ malt or not.
Hops
Hops are one of the biggest contributors to flavour and aroma in popular modern craft beers. They can contribute an incredible range of flavours as well as effects in the beer, some desired, some not.
Deciding on what hops to use can be a daunting task. What should I use, is it true to style, if I use more than one will they work together? All of these questions often plague the minds of brewers that have just started experimenting with recipe creation.
In this section I’m going to cover:
- Bittering Hops
- Flavour and Aroma Hops
- Noble, American, New World and Pacific Hops
- Hop Combinations
- Hop effects in beer
- Hop ageing and planning for longevity
For any more in depth content, feel free to head to the ingredients series post on Hops.
Bittering Hops:
This is the prime purpose of hops, something bitter to counteract the sweetness of the malt. It provides balance to the beer but along the way brewers discovered that certain hops did this better than others, these are commonly called bittering hops. They generally have a high alpha acid content and a neutral flavour profile. This is ideal for a few reasons:
– Firstly you use less material to get the same amount of bitterness. This saves money and saves on hop material being in your beer that you need to somehow remove so it doesn’t start to contribute vegetal flavours.
– Secondly no unwanted flavours are contributed to the beer and its left very clean tasting. For example a lager or cream ale where clean, easy drinkability is desired.
Due to their nature, intended use and given how hops achieve bitterness (via conversion of alpha acids into iso-alpha acids in the boil) these hops are generally added at the beginning, if not before any other hops used in the boil.
Some examples of classic Bittering Hops are:
- Magnum
- Columbus
- Warrior
- Simcoe
Flavour and Aroma Hops:
With the continued popularity of styles like pale ale and ipa (among others), this is now a major focus area of brewers in choosing their hops. Hops in this category are praised for having a high concentration of oils that produce a wide variety of flavours when present in beer. These hop oils can be fairly volatile so additions in the boil are generally later or even afterwards in a ‘whirlpool’ or ‘Hop stand’ addition so as not to remove most of the oils as well as liberally dry hopping with complex combinations of hops to help flavours develop.
Brewers are careful in choosing these hops as they can make or break a beer depending on how much is used, when they’re used and in what combinations.
Some examples of popular Flavour and Aroma Hops are:
- “C” Hops (Cascade, Centennial, Citra, Chinook etc)
- Mosaic
- Galaxy
- Simcoe (you’ll notice this is in the bittering section as well, it can be used for both very effectively)
From here we start to refer to groups of hops according to the region in which they are grown. Hops from certain regions are often grown their due to their suitability to that climate so can have a distinctive flavour or style. These hops are typically broken down into a few categories:
Noble, American, and New World Hops:
Noble Hops: From various places in Europe, noble hops are traditional styles of hops that often have flavours ranging from Earthy and Spicy to Floral and Fruity.
American Hops: Perhaps the widest range of hops in terms of flavour and aroma. Everything from earthy or fruity to pine/resin or spicy. Generally grown in large crops in the northwestern states (Washington, Oregon, Idaho). Pick carefully to ensure the hops you’re choosing will compliment each other since there’s such a wide variety.
New World Hops: Generally varieties that originated in The Oceanic region (Australia/New Zealand). A large proportion of these hops exhibit tropical fruit or citrus flavours and make for a wonderfully light and fruity beer.
Yeast
The biggest decisions with yeast are generally are you making a lager or an ale and what temperature are you fermenting at? From there you can separate yourself out into two main branches, ale and lager yeast.
Generally, with a few exceptions on each side, lager strains are fermented cooler (10-15˚C) and have a clean flavour profile while ale strains are fermented warmer (16-25˚C) and have a wider variety of flavours between strains.
The yeast strain you choose might follow a style guideline (Expressive German Ale strain for a Hefeweizen for example) or compliment a desired flavour in the beer (Fruity esters in a fruit-forward ale). It might be to achieve the cleanest flavour possible (Clean American ale or clean German lager strain) or even to achieve a process-related goal (such as a warm-fermented Kveik strain for a faster fermentation time).
The only other consideration is pitching rate, which should be around 6 million cells per ml or around 140 billion cells for your average 23l brew. IMPORTANT: if it has a high original gravity (above 1.050 or so) or is cold-fermented then use double or triple the amount of yeast as standard as it will respectively either physically need more yeast to metabolise the sugars or will just work slower so may stall.
Just make sure what you have is in date, stored cold until you use it and will exhibit the flavours you want. Bear in mind
Water
Honestly, until you’re familiar with the other aspects of the process and ingredients, this is the last thing to obsess over or worry about.
With that little disclaimer out of the way, getting water right can have a great impact on your beer if you’re looking to get a bit more flavour control in that last 5% of a recipe. It can make a good beer great or make it seem a bit flat (flavour-wise not carbonation) if it’s off. What it won’t do is make a bad beer good. Which is why I say to look at it once you’ve done everything else.
The most important thing to remember is to know your water profile as it currently stands, if you don’t know that then it’s like figuring out how to read a map without knowing your starting point. Chances are you won’t end up where you want to be no matter the map.
You can get your water profile usually from your local water authority, government body or government contracted company (e.g. Urban Utilities here if you’re in Brisbane)
Specialty Ingredients
These will really depend on what you want to achieve with your beer, I highly suggest checking out the Specialty ingredients post for this area as it is a very broad area that is really deserving of its own post. The one thing I’ll add in this section though is that specialty ingredients can be whatever you want them to be, from chocolate and fruit to chillies and spices. If it tastes good, you can put it in beer, season how you would a meal. A good suggestion for how long to leave things in or how much to put in is get one bottle of a similar base beer you plan to brew and add enough specialty ingredients for just that one bottle. Then you can scale up to the amount needed for a full scale batch.
Process Decisions
This can be a decision almost as important as ingredients. The variables you want to control that are purely process-related are usually:
- Mash temperature
- Mash pH
- Mash steps/length
- Boil length
- Whirlpool
- To cool or not to cool
- Pitch and fermentation temperature
- Cold crash
- Packaging & serving
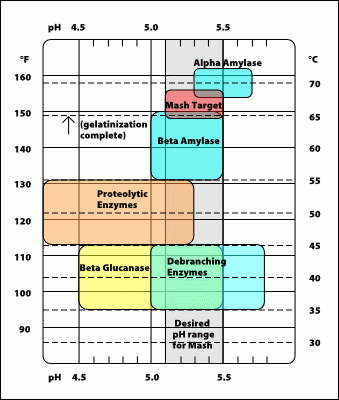
Mash temperature is a fairly simple one, it directly correlates with which enzymes are currently active within the grain to help convert starch into sugars. In the graphic below there are many different mash temperatures and rests, for the most part nowadays you are looking for Beta and Alpha Amylase enzymes which are directly responsible for breaking down the longer chain starches into simpler sugars. Before malting had advanced to the level of control we have in modern times the brewer had to use other mash temperatures in a series of steps to help break down different parts of the grain to allow a full conversion of starch to sugar. Generally 55-65˚C is your Beta Amylase which gives a lot of super fermentable sugars for a dryer beer with a thin body. Around 70˚C give or take a few degrees is your Alpha Amylase which gives some fermentable sugars but lots of unfermentable ones for a sweeter beer with a fuller mouthfeel. Most people aim somewhere in the middle or towards the upper end of the Beta Amylase range (65˚C) to try and get at the best of both worlds with some Beta Amylase working overtime just before it starts to get too hot and denature and some slower-working Alpha Amylase in the background for a bit of body.
Because the mash is a chemical reaction, it depends not only on temperature but also pH or how acidic the solution is in which the enzymes are working. The graphic above shows two axes, temperature in the vertical axis and pH in the horizontal axis. The ideal pH range for the enzymes to work in is a pH of 5.1 to 5.5. This seems quite narrow but is easy to adjust with a pH meter and some lactic acid. Water calculators like the ones mentioned above often have a mash pH value and it’s important to remember that this is only predictive and depends on the values that you put into it.
Mash length is totally determined by how much starch is left to convert to sugars. There’s two methods of determining this, either leave it for a really long time (usual convention is an hour) or measure and see when it’s done to save time. You can test for this conversion using any form of iodine, iodine turns black in the presence of starch, take a teaspoon of liquid from your mash, drop some iodine into it, if it turns pitch black, there’s still starch left, leave it a little longer. If it stays the reddish-brown colour then you’re good to go!The boil length you choose is critical for three things, sterilising the wort, boiling off and getting rid of any compounds that can cause off-flavours and boiling hops to isomerise (fancy word for change the structure of) alpha acids to add bitterness to the beer.In terms of sterilising the wort that takes place in the first few minutes (general guidelines for sterilising a liquid for consumption is a vigorous boil for at least 10 minutes).Isomerisation of hop Alpha Acids begins almost immediately and will continue until no more remain. For the most part, it is a fairly inefficient process and the rate of extraction depends on many factors from wort composition, boil vigour, the hop you’re using, the particular year or crop of that hop etc so there really isn’t a good way to predict it for every beer. For this reason, you want to boil for a longer time that seems reasonable to isomerise the alpha acids, most people choose their Bittering addition of hops to be put in at the 1 hour mark.
The conversion of compounds that are precursors to off flavours is another important part of boiling, these include SMM (S-Methyl Methionine), a precursor to DMS (Dimethyl Sulphide) which gives nasty overcooked vegetables/corn flavours or precursors for Diacetyl. Again the length of the boil required to fully eject these compounds depends on the malt used and the vigour of the boil but the general rule is the lighter the base malt, the longer the boil. So if doing a single malt Pilsner with a traditional German or Czech Pilsner malt then you’d boil a little longer than the 1 hour (I do 75 minutes but some go as long as 90 minutes or even 2 hours!) whereas if you’re doing something from a simple American or British ale malt then you would likely be fine with the typical 60 minute boil.
After the boil typically comes cooling but just before we get there we’ll pass over whether or not to use any hops in the whirlpool phase. What is a whirlpool phase and why do we do it?
Whirlpooling, as do many habits/processes from home brewing, has its roots in commercial brewing. A strong current would be pumped through the wort (via a pump in the boil kettle) to help the hops collect in a cone in the middle. The wort would then be drawn off from the side, making for a clearer wort going into the fermenter.
Beyond this reason though, it presents another opportunity to add hops to get flavour and aroma with very little bitterness. Useful for hoppy beers like IPAs or NEIPAs that are typically made with lots of layered hop flavours and in the case of the NEIPA, even moreso while having less bitterness than their west coast counterparts. It is typically done for 20-30 minutes on the home-brew scale once the wort reaches about 80˚C so the heat is less likely to isomerise the Alpha Acids and increase bitterness.
Finally we’re onto cooling, from here on out we need to be very careful to ensure everything is cleaned and sanitised properly as we can’t rely on the heat of the wort sterilising anything. But the question is, do you cool or not? With the rise of popularity in the no-chill method, not cooling is now the…..coolest new way. The no chill method basically involves putting your hot wort (after the whirlpool if you’ve done one) into a plastic water storage container (a cube) filled right up to the brim and sealed. The hot wort serves to sterilise the cube and filling it right up to the brim reduces the risk of over-exposure to oxygen. Here’s a quick pros and cons list, I’ll try and make it so that the pros for cooling are a direct con for doing it the no chill way and vice versa for cons:
Cooling Pros
- No unintentional isomerisation of Alpha Acids
- Gets your wort into the fermenter and ready to pitch quicker
- Allows any residual hot break time to cool and drop to the bottom, resulting in a clearer final beer (this one is just from my own experience of both methods)
Cooling Cons
- Makes the brew day a little longer
- More stuff to clean
- Doesn’t allow for storage of wort for a later date (no chill cubes can generally be stored for weeks/months before using depending on the beer)
Pitching and fermentation temperature are other important factors to consider and will largely depend on what yeast you are using. Some want to be the whole temperature the whole way through whereas others like to be pitched warm and allowed to naturally cool to the final fermentation temperature or have a “diacetyl rest” at the end where the temperature is increased for the last few days or even hours of fermentation to ensure any fermentation byproducts have been cleaned up by the yeast. The best advice here is to research your yeast and experiment with it over time.
For example the general temperature people tend use for US-05 or other American ale strains is around 18-19˚C, I always had a flavour in there that I didn’t like when I used it so I read up on it and saw some people reporting a peach/stonefruit flavour being prominent when used at lower temperatures. I raised my temp to 21˚C to get away from that and the problem was gone. Researching your yeast will pay dividends in the end, trust me.
After fermentation it’s time to get your beer clear and ready for packaging. The first step in this is commonly to do what’s known as a cold crash by dropping the temperature rapidly (as quick as you can really) to as low as you dare to go and leave it there for 3 days or so. This reduces the amount of particles the beer can hold in suspension as cold liquids, you may remember from high school science class, aren’t as effective at holding particles in suspension or solution. But how low can you go? Remarkably, because of the alcohol content its freezing point is generally below 0˚C so for most standard strength beers or higher you can usually go to 0˚C pretty safely but if you don’t trust your system not to accidentally freeze it or you’re doing a brew that’s lower abv (I’d say 3.5% or lower) then you can play it safe and set it to 1-2˚C. I usually go 0.5-1˚C. The lower you go the quicker it will happen so it becomes a balance of getting a clear beer slowly and safely or quickly and running the risk of creating an accidental Eisbock!
The only thing to watch out for is that gasses expand and contract MUCH more than liquids so you will create negative pressure in your fermenter as it cools which will suck air in and possibly oxidise your beer. A good way to get around this is put a balloon in place of the airlock in the last couple of days of fermentation to capture some natural co2. This will then be sucked back in when you cool everything down instead of sucking in air.
Now that it’s nice and cold, it’s time to get your beer into a vessel it can be served out of. If bottling make sure you use a bottle priming calculator that factors in the bottling temperature as the gas will expand as it warms and you might create too much pressure and either over-carbonate your beer or create some bottle bombs! If you’re legging you’re fine, just transfer, attach your gas and you’re good to go!
Documentation
Something I’ve found SUPER useful is taking notes if I did something during the process that isn’t explicitly stated or is different from what’s written in the recipe.
I also inevitably change every recipe after I brew it to adjust it for the next time and constantly try to improve it. so having a total list of every change you’ve ever made and on what date should give you a running indication of what’s working and how a recipe has evolved over time. I brewed my Scottish Heavy recipe recently and noticed it was markedly different from last time and not in a great way, it was darker but didn’t have the malty richness that the first one had. I looked back over my notes and saw the changes had actually come from a friend suggesting changes, I removed those changes to revert back to my original recipe and it was right back where I wanted it to be. If I hadn’t kept a note of everything on the date a change was made I wouldn’t have been able to do that so accurately. It really adds an element of repeatability and extra control to your brews.
Conclusion
Wow that was a big one! I’ll keep this short and sweet now as if you’ve made it this far you’ve done well!
I’m looking at this post as both the big comeback of more regular posts as well as the kind of capstone to the ingredients series of posts and precursor to an upcoming series of posts where we dig into various aspects of the process and some techniques.
Next post however I’m going to be sharing a bit about the journey I’ve been on in the last however long it is since I last wrote a post. It reveals an exciting project as well as information you may be able to use if you ever wanted to go down the same road I’ll be travelling.
Bye for now, all the best,
Sean
If you have any feedback or edit suggestions for this post please contact us and let us know. We want to ensure the correct information is presented in the best possible way so that fellow brewers can stay well-informed.
Want to stay up to date with the latest from Sean and New Beerginnings? Like us on Facebook and Instagram or reach out to us on Reddit.