
Hi All,
Thanks for joining us for our third installment in the ingredients series. This week is all about Yeast. We’ll cover a bit of background on it, its history in brewing. Common types and methods of usage. As usual with these potentially science-heavy posts, I’m going to cover anything necessary to get you brewing and using this ingredient with confidence while leaving the in depth details for a later series of posts.
Last Week In New Beerginnings
BeerSmith 3 is out! I use this software and was very excited to see version 3 for desktop and mobile come out. I spent a few hours creating and arranging all my folders to organise recipes then inevitably thought of a better way to do it so inevitably tore them all down and started again! Rinse and repeat a couple of times and I have what I think is a pretty good system.
I generally brew beer by what I feel like rather than picking through the list of BJCP styles. So I have my British, American, European and Other folders along with a clone recipes and New Beerginnings folder for recipes I use here as part of brew day posts.
This said, it’s good to group similar recipes together, so within those I have styles like IPA, Pale Ale, Lager, Stout etc. I feel this is better than just having an “IPA” folder since English, American and Belgian IPAs can vary drastically and while I’m in the mood for one, might not be in the mood for another.
You also have the option of copying recipes between folders so you have multiple copies that fit into different categories. For example, a Sierra Nevada Pale Ale clone would go in my American -> Pale Ale folder AND my Clone Recipes folder. This way I can find it no matter which place I looked. The one thing to bear in mind is that if you edit a recipe in one folder it does not edit it in others. Meaning that you need to re-copy it to the other locations it fits once you’re done editing.
Yeast
Now on to our main topic for this post, everyone’s favourite microorganism…Yeast!
Background
The yeast we have used to brew with for thousands of years is a single-celled Fungus that at the most base level converts sugar (in the form of Maltose, Maltotriose, Glucose, Sucrose and Fructose) into Carbon Dioxide and Ethanol (henceforth referred to as CO2 and Alcohol). It was first observed in 1680 but not considered to be a living organism at the time. Hundreds of years later, in 1837, Theodore Schwan was responsible for their correct identification as Fungi. However, the first person to recognise their importance in the production of alcohol was Louis Pasteur, the French Scientist in the late 19th century.

Its cells are Eukaryotic, meaning it has a membrane-bound nucleus containing all of its genetic material rather than the genetic material floating around in the cytoplasm of the cell. This is an advanced type of cell structure that’s similar to human cells except Yeast cells have the added benefit of a cell wall that helps give some shape to the cell as well as extra protection.
There are many kinds of yeast available to brewers but most are strains of Saccharomyces Cerevisiae or Saccharomyces Pastorianus. The former is top-fermenting, meaning it ferments from the top of the wort down throughout and is also known as Ale Yeast. The latter is a bottom-fermenting yeast and is generally used for lagers. I was watching a talk by a world renowned brewing professor Dr. Charlie Bamforth and he gave a little tip to help always differentiate between these two. Look at the last 4 letters of each strain and you’ll realise which one is the bottom-fermenting yeast!
While the uses of these vary (lager strains like to be fermented cooler than ale strains for example), I’m going to try and use one description of everything that should fit both types and only talk about both Ale and Lager yeasts separately when referring to something specific like an exact temperature or using scientific nomenclature (S. Cerevisiae or S. Pastorianus).
Reproduction & Life Cycle
We must understand the way that yeast reproduces and its life cycle in order to create a good environment for it in brewing, especially if you get into the world of harvesting and repitching yeast. If yeast does not have a good, healthy environment then it may cause unwanted effects in fermentation or not ferment at all, but more on that later.
Yeast goes through several phases when we put it into wort. First, it adapts to its environment and grows, multiplies and reproduces. This is the adaptive phase, sometimes called the lag or growth phase. This reproduction is an aerobic reaction, meaning it requires oxygen for the yeast to reproduce by budding, a bud forms on the outside of the yeast cell and eventually splits off and becomes its own cell. This process is also used to build lipids and other nutrient reserves for the yeast to use during the next phase. If Oxygen is not present during this phase, the reactions can not take place and you will end up having far fewer viable yeast cells left to go on to the next phase.
After this, the next phase is where fermentation begins, by which I mean the yeast begins to consume sugar and produce Alcohol and CO2, this is where you’ll see your airlock start bubbling at the top of your fermenter. The fermentation process is anaerobic, meaning it does not require oxygen. In fact, oxygen at this stage of the process can begin to have some serious detrimental effects to your beer so it is advised that you limit any possible exposure.
The next phase of the cycle, depending on yeast health, nutrient reserves and environment is either being harvested for further replication and use or autolysis (cell death caused by its own enzymes). It’s generally advised to get your beer off the yeast at this point as too much contact with autolysed yeast can cause some nasty off flavours. However, in practice I’ve found the point at which it’s noticeable does not make much difference on the homebrew scale. Nevertheless, I do it because it’s good practice and if it has the chance of keeping my beers consistent and free from off flavours, I’ll do it.
In terms of Oxygen, it is vital in the initial stage of the yeast’s life cycle so it’s recommended that you give the wort some exposure and aerate it somehow. This can be done with an Aeration Stone or simply by being a little less careful when transferring from the kettle to the fermenter and not being afraid to splash it around a bit! At all other times however, do not expose to oxygen unless absolutely necessary (e.g. for dry hopping) as it will have a detrimental effect on the flavour and appearance of your beer along with its shelf life.
Another point worth noting is that unless you are carbonating with a keg and pure CO2, the yeast also needs to be used for a secondary fermentation in the final package, be it a keg or bottle. This secondary fermentation primarily focuses on the production of CO2 to carbonate the beer rather than the production of alcohol, although a slight increase in ABV of up to or around 0.5% is to be expected.
Preferred Environment
Would you be ok to live your entire life surrounded by hot liquid that becomes so alcoholic that it slowly stops your ability to do anything? Or be so cold that you are literally made dormant, incapable of eating or going about your day? No? Neither does your yeast!
The environment which we create for our yeast is extremely important to the quality of the finished beer. Anywhere too far outside this ideal environment and it begins to act strangely, producing flavours it normally wouldn’t, or stopping working altogether! It’s a combination of factors which make up the ideal environment for yeast.
- Temperature – Too hot and they produce higher alcohols than simple ethanol, ones similar to what you would find in paint stripper and other industrial alcohols, and this is exactly what they smell and taste like in the beer. Far too hot and it eventually kills the yeast and no more fermentation continues. Too cold and fermentation, like any chemical reaction, slows down and eventually stops. The yeast becomes dormant but warming it back up again will kick it back into gear. Ale Yeast ideally ranges from around 18-28°C and Lager Yeast from 12-15°C. Different strains may vary, always check the packet before using.
- pH – pH is important for the enzymes in yeast that enable the metabolic processes of the cell. There are many of these that do different jobs but at the base level the process goes Sugar -> Pyruvic Acid -> CO2 & Ethanol. If the pH varies too much (ideal range being around 4.8-5) then the enzymes permanently change and can no longer do the job they were designed for. This is called denaturing.
- Aeration – As mentioned before, this is vital for yeast when it’s in the adaptive or growth phase in order for the yeast to multiply and build its nutrient reserves.
Natural Competitors – Bacteria
Like any living thing in the world, microscopic lifeforms like yeast have competition for food. This includes other yeasts as well as bacteria. Luckily, good cleaning and sanitisation practices can keep these in check. When you pitch an appropriate amount of viable yeast into a sterile container filled with nutrient rich, sweet wort, it makes quick work of reproducing and becoming the dominant lifeform in there so anything else is generally overpowered. The key to this is the first few components of the previous sentence.
- Pitch Rate – This refers to how much yeast you pitch, or add, to a given amount of wort. Too little and the yeast gets stressed and possibly dies before fermenting all the available sugar. Too much and you may get a very yeasty-flavoured beer that is cloudy and not all that pleasant to drink.
- Yeast Viability – The older yeast gets, the less of it is able to reproduce and ferment wort. Dry yeast generally has a longer shelf life of viable cells but liquid yeast has more viability as it’s generally fresher. With dry yeast, you can choose to rehydrate or sprinkle directly onto your wort, I’ve had great results with both. With Liquid yeast you generally need to make a starter as they don’t come with as many cells as dry yeast so you may be underpitching. You should also make a starter or pitch multiple packets if your liquid yeast is over 3 months old, I’ll cover this process later in the post.
- Sterile container – This is vital for ensuring your yeast has as little competition as possible from foreign wild yeast or bacteria. Clean your fermenter thoroughly after use and before the next use if it’s been a while but ALWAYS sanitise prior to use with a good quality no rinse sanitiser like Star San. Remember, clean to get rid of all the dirt you can see, sanitise to get rid of all the nasties you can’t!
- Nutrient Rich Wort – You want to make sure you have the best food for your yeast. This means aerating your wort, using good quality, fresh ingredients, adding yeast nutrient if needed (especially helpful with big, high gravity beers). We’ve been through aeration and I’d like to think most of us are sourcing the best ingredients we can so onto the last point. Yeast nutrient contains everything from enzymes to nitrogen and other minerals to ensure your yeast stays healthy throughout fermentation and is especially helpful if reusing yeast over several generations. Another alternative that makes an acceptable yeast nutrient is using old yeast that has passed its use-by date or is not needed (especially useful for extract brewers that swap out the canned yeast for another variety!)
Production of Yeast
Yeast is everywhere, the current theory about the yeast we use today is that it’s a descendant of a yeast that originally came from the skin of grapes. This makes sense since wine was also produced in very high volumes for at least as long as ales and lagers.
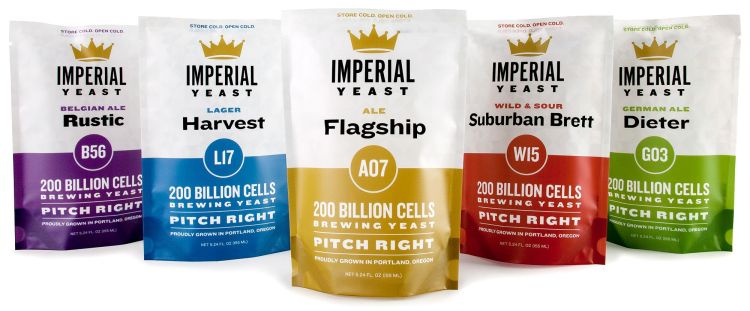
This said, there is such a variety of wild yeast on everything that producing a specific strain cleanly on a commercial scale is incredibly difficult. Several companies make yeast cultures available to home brewers in both dry and liquid forms. The most popular and recognised of these are Fermentis (e.g. US-05 and W-34/70 strains), White Labs (e.g. WLP007), Wyeast (e.g, WY1056), Imperial Yeast (e.g. A07 Flagship) and Mangrove Jacks (e.g. M44 US West Coast).
All of these companies take great care to ensure the purity of the yeast they produce as well as packaging it in such a way to make it sterile yet easy to ship/store. This requires a lab and sterile environment along with testing equipment to make sure they are aware of the exact strain they are selling.
The production process, which varies from company to company can be best explained by being fairly general and gathering information from the websites of each. See below:
- Lab – The yeast cultures are isolated in a lab from various sources and are ensured to be as pure as possible before moving on to the next phase.
- Fermentation – Each yeast is introduced to wort in order to go through the first few stages of fermentation. The adaptive phase to grow the yeast cell count for harvesting and fermentation to ensure the yeast is viable and has enough nutrient reserves to go on to another brew (or several!)
- Centrifugation – This separates the yeast from the wort to ensure only yeast moves on to the next phases.
- For Dry Yeasts, they are then stored for some time to make them dormant then filtered for more purity and dried.
- For liquid yeasts, they are simply packaged at this stage.
With dry yeasts, some extra components are added to aid the useability of the end product. Usually an emulsifying agent is added to help clump the yeast together as without it the yeast cells are so small that they will not make a good powder, more of a cake!
Using Yeast
At the risk of continuing to repeat information, I’m going to keep any information about aeration, pitch rate, wort, temperature and pH considerations to an absolute minimum! Instead I’m going to talk about the rehydration, starter and reuse processes.
Rehydration –
For dry yeasts, you may choose to rehydrate them before pitching. This aids with viability from the minute they hit the wort instead of having to rehydrate, then get to work. I’ll take my rehydration instructions directly from this fantastic Fermentis tips and tricks sheet.
1. Sterilise all equipment and prepare some sterile water (non-chlorinated tapwater is perfect) or wort equal to 10 times the weight of yeast being used, i.e. 10g of yeast = 100g water/wort. If using water, boil first then allow to cool. Ideal temperatures for this are 25-29°C for ale yeasts and 21-25°C for lager yeasts.
2. Gently stir and leave for 30 minutes.
3. Pitch immediately or within NO LONGER than 4 hours.
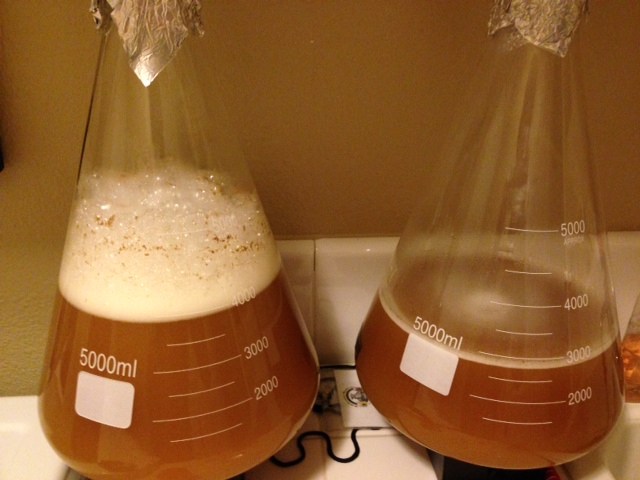
Making a Starter –
For liquid yeasts, a starter is often recommended to ensure you have a sufficient amount of yeast to pitch into your beer. Dry yeasts generally do not need a starter, just rehydration if you choose to do so. This is best done the night before or at least 12 hours before the beer is ready for yeast pitch. I’m taking this information from the White Labs web page on making starters as I’ve found it to be the best method that works for me. Most measurements in imperial.
1. Assess what size of starter you need based on the volume and specific gravity (SG) of your wort. For most normal batches within the 1.050 area a 1l starter is plenty.
2. Add 2 pints of water to a pan with 1/2 cup of light dry malt extract (LDME) and boil for 10 minutes and cool.
3. Pour this wort into a sanitised glass container like an Erlenmeyer Flask and pitch the yeast into it. Cover this with sanitised aluminium foil.
4. Shake the flask vigorously to aerate the wort.
5. Keep the starter at room temperature for 12-18 hours stirring occasionally or use a magnetic stir plate to keep to starter aerated and the yeast in suspension.
6. After 12-18 hours, switch off the stir plate and allow the starter to settle as much as possible.
7. Decant most of the separated wort off the top right before pitching, being careful to not disturb the yeast layer at the bottom. Decant around 80%.
8. Once the yeast and wort are close to the same temperature, swirl to get the yeast back in suspension and pitch the starter into the wort.
Other Considerations
The only thing we haven’t talked about yet is the impact yeast has on flavour and aroma with Esters and Phenols. With different combinations of these compounds, each with a unique character, it’s estimated that yeast can contribute up to a phenominal 600+ different flavours to beer.
Esters typically give fruity aromas and Phenols can give some spice. You will find a description of the flavour/aroma profile that yeast is likely to give online before buying to allow you to select a yeast with the character you desire. Usually the yeasts a company produces are categorised by beer style. In the actual production of esters and phenols during fermentation, it is typically a function of many things.
– Temperature being a big one, the higher the temperature, the vigorously the yeast will ferment the wort but it may not be clean in doing so and unwanted compounds may result.
– Shape of the fermenter. Yes you read that right, the physical shape of a fermenter can affect the production or absorbtion of esters and phenols. Tall, narrow fermenters with conical bottoms like the SS Brewtech Chronical help by reducing the amount of trub in contact with the wort and the tall shape provides enough hydrostatic pressure (water pressure within a tall, still column due to gravity) to significantly reduce the absorbtion and production of esters and phenols respectively.
Thanks for joining us for this big post on yeast. These ingredients series posts are aimed at getting you familiar with the ingredients we use to brew and get you using them with confidence so you can make better beer.
We covered a little bit of the history of yeast, delved somewhat into its anatomy and biological processes while learning how to take care of it properly and use the different commercially available varieties properly.
Next in the ingredients series is one of the most important but most overlooked ingredients. Water. It forms at least 90% of our beer yet we often forget that water has a taste of its own and can impart these flavours and characteristics to our beer.
Until next time, happy brewing,
Sean
Want to stay up to date with the latest from Sean and New Beerginnings? Like us on Facebook and Instagram or reach out to us on Reddit.

2 thoughts on “Ingredients Series #3 – Yeast”